1fx Mod Download & Installation
1fx Mod Download & Installation
1fx is a game modification (mod) for Soldier of Fortune 2.
The latest official version is 1fx 0.82b.
1fx 0.82b for Players
1fx. Client Additions, what are they?
The client additions that come with 1fx. Mod are built to extend the functionality of the base system or existing client mods. That means existing client mods can also use the new functionality provided.
Feature list
There are quite a few notable features:
Broad Windows compatibility – compatible with Windows versions as low as Windows 2000. No extra redist packages or other programs are needed on the client PC.
Can be downloaded directly from the server without any other manual tweaks, only one .pk3 package is required in order to use the additions. The .pk3 is only ~400 KB. The rest is all handled automatically.
Provided as DLL instead of QVM. In general this means a boost in FPS of about 25-50% without any other tweaks.
Extra grenades embedded in code. This means compatibility with the extra v1.00 gametypes Hide&Seek and Zombies. Those are also automatically enabled on servers that enforce the new Client Additions.
HTTP downloader. The server can specify extra pk3 files to be downloaded from any webhost. Only .pk3 files are allowed, other file types won’t be downloaded automatically. Servers can also specify a maximum download speed so no other services on the host are affected. Clients can use the ESCAPE key to cancel the HTTP downloader.
Self updating system. The Client Additions perform checks upon initialization, and will update directly from 1fxmod.org if an update is available. This ensures future compatibility with new 1fx. Mod features and live bug fixes without any client interaction.
Third person allowed in servers that have g_allowThirdPerson set to 1. Clients can switch between view state using /3rd and /1st. If the server disables this, clients won’t be able to play in third person.
Drawbacks
There are also a few drawbacks when using the 1fx. Client Additions:
Clients that don’t have the 1fx. Client Additions are automatically kicked from the server. There’s no way for them to properly play on a server that enforces these client additions. They are informed to turn on downloading and reconnecting.
Regular server downloads are disabled (the ones you receive when you set /cl_allowDownload to 1). Not really an issue since I can’t imagine anyone wanting to download anything directly off the server with HTTP downloads enabled.
Your regular settings are gone after an initial connect. For example, a 1fx. Server with ROCmod client and 1fx. Client Additions enabled will force the client to use the “1fx.rocmod” directory instead of “rocmod”. This is a restriction because you can’t have the regular files interfere with the 1fx. Client Additions embedded in the target mod. No worries, they won’t reset every time, just this one time when you join a 1fx. Mod server that enforces 1fx. Client Additions.
One additional reconnect when connecting to a server for the first time. This is necessary to download additional pk3s from the server and to update the 1fx. Client Additions if necessary. This only happens when switching from one server to another, a /reconnect won’t make you reconnect twice.
Server settings
Any future 1fx. Mod server on Gold can make the necessary changes to enforce the clients to use the 1fx. Additions. These are the CVARs that you can set on the server:
g_enforce1fxAdditions: When set to 1, you enable the client additions on the server. This also enables Hide&Seek and Humans&Zombies and forces sv_allowDownload to 1 (with only the CoreUI package exposed to clients). If this is not set to 1, the other CVAR settings below have no effect.
g_httpRefPaks: A space delimited list of .pk3 files you want the client to download when connecting to your server. If pk3 files contain a space, don’t worry. The client automatically detects this and makes changes accordingly. Set to “none” to disable. It is recommended to exclude map packs because that way a client may download duplicates. Example: “A Bridge To Far.pk3 mp_northport.pk3 mp_office.pk3”
g_httpBaseURL: The base URL clients download maps from. This needs to be accessible from the web, or clients won’t be able to download any maps from your server. This needs a leading slash in order to correctly work. Set to “none” to disable. For example: “http://boeboe.uk.to/pub/maps/”
g_httpMaxSpeed: Maximum speed client is allowed to download from the base URL in KBps. Set to “0” to disable. Example: you’d set it to 5000 to enforce a maximum client download speed of 5 MB/s or 500 for 500 KB/s.
Client settings
1fx. Client Additions only add a few essential things to the client:
/1st and /3rd commands. Use this to switch your view state. The client respects the 1fx. Mod server’s g_allowThirdPerson value. If this is set to 0, setting to /3rd has no effect.
Recommendation message for clients when in a Hide&Seek or Zombies gametype server and g_allowThirdPerson is set to 1 on the server. The message will state that playing in third person is recommended at every spawn.
Extra grenades for additional gametypes.
Source code
These additions are open source, you can find it here.
1fx for Servers
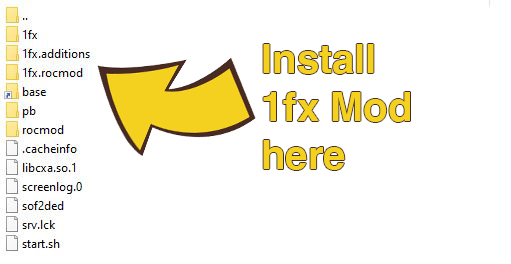
To install 1fx on your game server you first need to download and extract the OSP serverside files from the download below to your servers Soldier of Fortune 2’s root directory, usually via FTP.
Installing 1fx on your game server is a simple process, in most cases it just requires you to copy the mods serverside files to your game server’s root directory (where the SoF2 linux binary or windows exe is located).
Step 1 – Download & Extract 1fx Server Side files
Download the 1fx and extract the files to your PC.
Step 2 – Upload the 1fx directory via FTP
Upload the “1fx” directory to your servers Soldier of Fortune 2 home directory.
We recommend FileZilla FTP Client to connect to your game server, for more information on how to connect to your game server over FTP then check out our User Guide for a short tutorial.
Step 3 – Set fs_game in the start script
In most instances Soldier of Fortune 2 game servers use a script to start and stop the server and define additional parameters to load.
Below is an example Linux start script for Soldier of Fortune 2 v1.03, to enable 1fx you need to edit or add the +set fs_game 1fx and +set vm_game 0 parameter to the game servers start script.
./sof2ded +set vm_game 0 +set dedicated 2 +set sv_pure 0 +set sv_punkbuster 0 +set net_ip 31.186.250.93 +set net_port 20199 +set fs_game 1fx +exec yourserverconfig.cfg &
Windows servers in most instances use a batch file (.bat) to start the server, if your game server is running on Windows then simply edit the .bat file and the fs_game parameter same as you would for Linux.
Step 4 – Restart your Game Server
Since you are changing the game version of your game server you need to restart the game server to load OSP.
Depending on where your game server is hosted this is either done via your host’s game server control panel, or via the SSH command line for those hosted on VPS or Dedicated machines.
1fx Admin Commands
Admin is a powerful tool used to help run a server, you should only give admin powers to people who you trust with the command:
\rcon addadmin #ID
1fx Mod allows 3 levels, from the lower level to the higher level they are B-Admin (Base Admin)- Admin (Regular Admin) and S-Admin (Server Admin).
1fx admin commands need to be entered into the console, with \adm before each command.
To get a players ID, press the TAB key to bring up players stats and id numbers or type \players in the console.
Open consol and type:
![]()
This command will show all the available admin command for the Admin level. This is the list for RCON user:
]\adm list
Lvl Commands Arguments Explanation
———————————————————-
[2] !adr adminremove
[2] !pl plant [Plant or unplant a player]
[2] !ro runover [Push a player backwards]
[2] !st strip [Remove weapons from a player]
[2] !ra removeadmin [Remove an Admin]
[2] !et eventeams [Make the teams even]
[2] !b burn [Burn a player]
[2] !m mute